Following a unexpected collapse of THE EMPEROR NAPOLEONS armies after the disastrous retreat from Moscow, RUSSIAN ARMIES have invaded WESTERN EUROPE.
The DUKE OF WELLINGTON has been sent from SPAIN to negotiate a withdraw of the Russians.
However, the Russian Armies indicates they plan to stay...and it's 7 days to the Rhine...
In my first game under the draft (February) rules for Field of Glory Napoleonic 3rd edition, I took my army off to fight Dave's Russians again. My last battle ended in an absolute disaster with the entire army routing for no damage...I hoped I could do better this time. The rules make a lot more sense than the 2nd edition did, but it was my first game playing under them, and Dave is one of the top 10 players of FOGN world wide, and played a half dozen games using it already. I thought the best I could do might be a draw.
 |
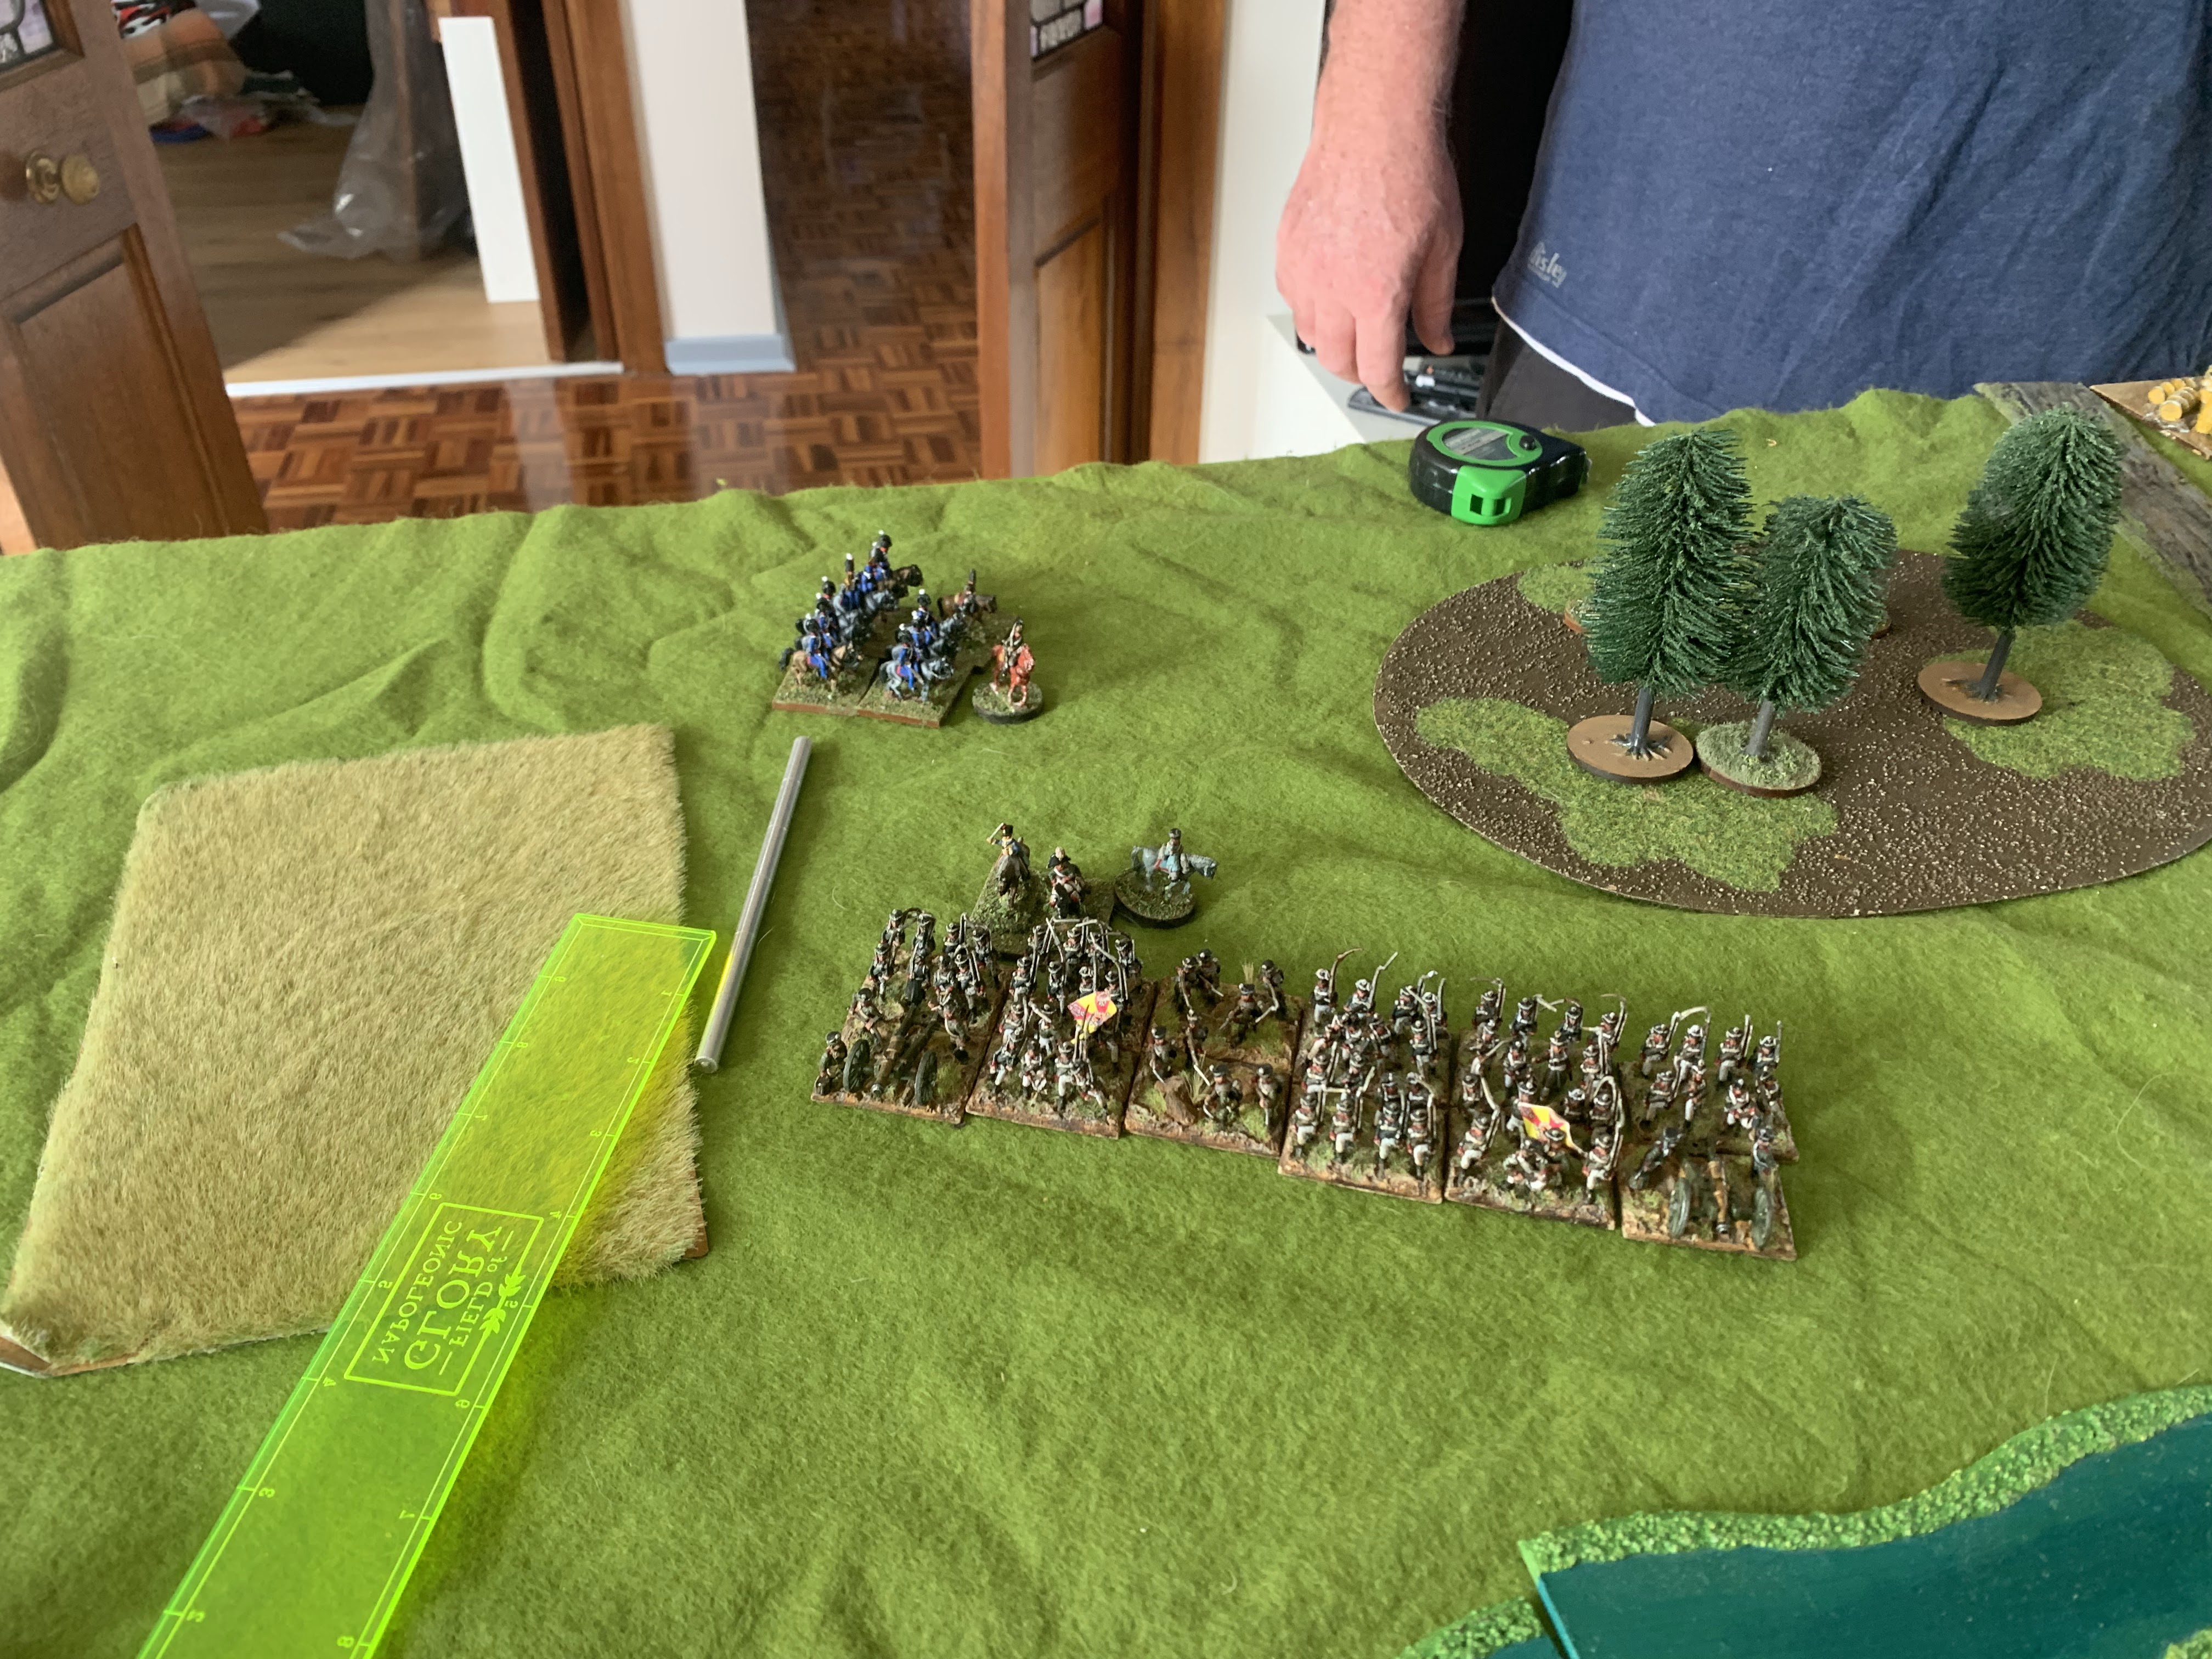
| The Battlefield, looking East from the western edge. I am deploying on the right, and face North |
Dave won the location roll off, and picked Eastern Europe. He blocked Flank and something and I blocked Prepared attack and something. I knew he'd have MAXIMUM ARTILLERY so I didn't want to get BOMBARDED for a turn before the battle started. With 4 divisions I had wanted to do a flanking attack, dammit.
He choose the most aggressive FRONTAL ASSAULT and I chose a cautious PROBE. His entire army would deploy and could only move forward for 2 turns (and move quickly too) and I would only have one division on the field, with another one in reserve and 2 more marching to the sound of the guns in reinforcement. I chose probe as I expected a frontal assault, and wanted to be able to dodge to one side or the other and force part of his army to attack thin air. Meanwhile, I would attempt the classic Napoleonic strategy of concentrating on one flank and destroying it in detail...
I choose 2 gentle hills and a difficult terrain with cover forest and he chose a town, open terrain and extra road. I hoped I could hide behind the reverse slope of the hills and use the forest as cover for my light infantry division. He choose the road to give him another place to put his LOC and the open terrain to give a clear place to advance.
I also choose a rough terrain stream to try and slow him down, another town and another(difficult) forest. He took some difficult crops and rough swamp terrain that had no cover for him to shoot his artillery across.
Unfortunately for me the hills ended up on my edge of the battlefield, and I put the river somewhat in his side. The rest of the terrain favored him and because I didn't choose a 2nd road, I had to put my LOC near the middle of the table.
I decided the only way to protect it was to to anchor one flank with the town to it's right.so I would attack on the left.
 | |
| My one division vs his entire army |
With him doing a direct FRONTAL ASSAULT, he put his entire army on the table first. I decided his left wing was the weakest, consisting of 3 infantry brigades (2 line, 1 light) and a light cavalry brigade. His heavy and medium corps level artillery was in the centre with 2 large infantry divisions and a light cavalry brigade, and his cassocks on the far right. He planed on using the swamp in the middle to divide my army and whichever side I went on, he could shoot me from the other side safely. Then he would attack the town with overwhelming force and take control of my LOC and force a general rout.
My plan was that I would use my 1st Division to attack his weaker right wing. My Cavalry Division would be in immediate reserve and come on the battlefield on my left flank. There the 2 divisions would pin his 1 with my heavier cavalry forcing his one brigade of light horse to retreat and then put his infantry into square where my Royal Horse Artillery and Royal Artillery attachments would blast him before charging home. The cavalry could come on the table with the Corps Commander on the first turn.
Elsewhere, my Flanking Light Division would hold my right flank based on the town and LOC and my 2nd Reserve Division would come into the centre- either to help hold the LOC or support the attack on my left. Both units were reinforcements, so would need to roll to arrive after the first turn, but were lead by skilled commanders so would get a bonus to do so. If needed, they could make a forced march to arrive one turn faster, but may be disordered in doing so (needing a command test to avoid it).
I knew I wouldn't have a long time to hold my right flank, but if I could catch his isolated division, I might be able to defeat it quickly and then have my cavalry run for his LOC.
Or in other words...I was re-fighting the Battle of New Orleans. And I was the British....
 |
| My main body 1st Division, looking towards his left wing |
My 1st Division consisted of a large unit of British Line with an attached artillery battery, an superior KGL brigade, a unit of Portuguese with a cavalry squadron (to keep enemy skirmishers away), and a unit of Portuguese poorly trained Conscripts as a 2nd line. The 3 units of line infantry all had an attached rifle battalion. I put the KGL unit covering my LOC and the road, the rest facing his right wing.
 |
| My right side KGL brigade covering the LOC, looking towards a LOT of enemy troops coming down the highway |
 | ||
| The Cavalry and 1st Infantry division march north towards the river, as the Russian division moves towards the bank |
The Russian army advanced in group move, meaning if the division moved together, they only needed one command point to move everything. I did the same and brought my Cavalry on the far left flank. With a super-heavy shock and 2 light cavalry units, I would be able to win any cavalry fight with ease. I also outnumbered him in infantry, with his 2 line and 1 light brigades facing my 4 line units (even if the 4th one was a weak conscript unit). I moved my KGL elite infantry up to be with the rest of tbe birgade, on it's right side.
 | |
| The Light Division moves into secure the right flank. |
I rolled well enough to get my Light Division and 2nd Division onto the battlefield as soon as possible. With the 2 Russian divisions almost at the town, I decided to force march the Light Division. That meant all the units had to make a command test or become disordered. Funnily enough, the Spanish Guerrillas and Lusitanian Legion both passed- it was the Superior Veteran Rifle brigade that failed! 3 dice and a re-roll on a 5+!
Thinking it was the most important place, I put the Rifle Brigade into the town, they were the best unit (if small) in the army. I put the Lusitanian Legion on the road and the Guerrillas to their left towards the swamp.
 |
| My Corps Commander looks over the army's positions. You will note from the good paint job, I did not paint them. |
 | |
| The Russian Division faces at my 1st Division |
My Portuguese unit took some fire from across the swamp into the flank via the Russian deployed artillery, and was disordered and unable to advance.
 |
| British Skirmishers pin down the enemy |
I was able to get one point of skirmishers' on the left side line unit. This can lesson their fire and forces a morale test at the end of then turn (which they passed). The skirmish point stayed until there's no enemy unit within 6 inches, they do a volley or involved in an assault, or they win the skirmish round.
 | |||
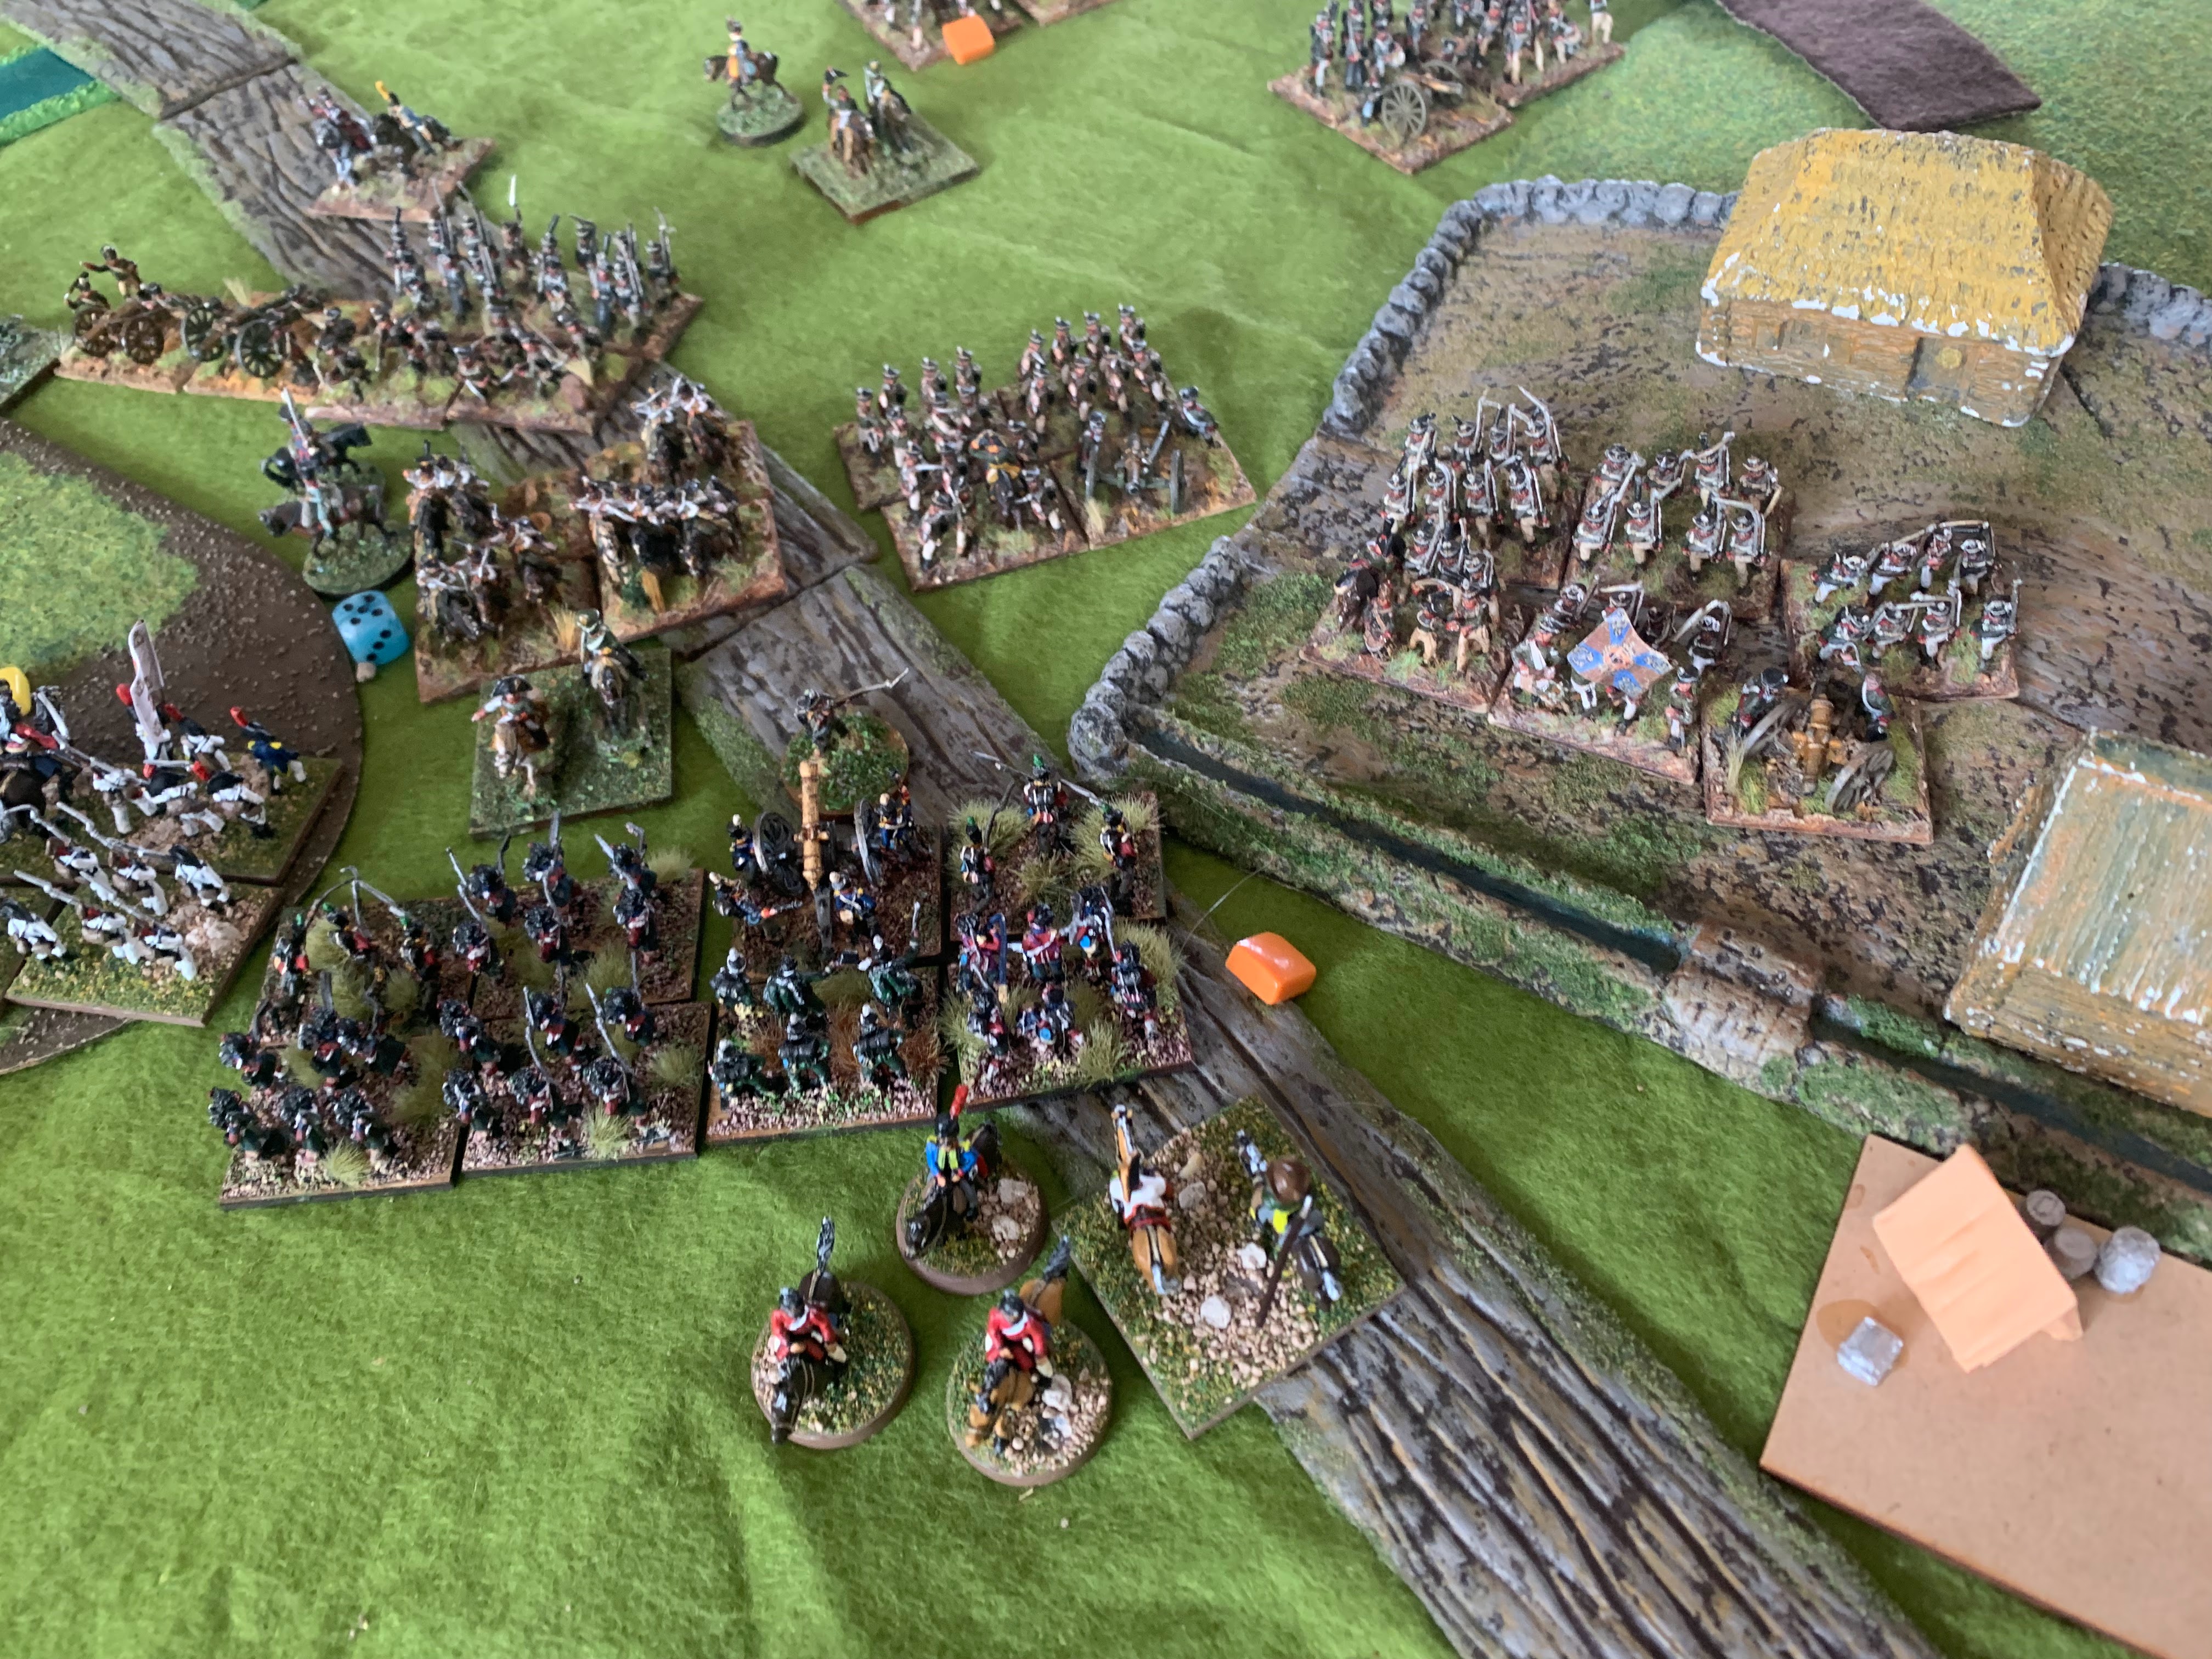
| The Russian army deploys to prepare to assault the town. |
With the bridge and lack of hostile units, the main Russian army crossed the stream without a problem, and their medium and heavy artillery deployed to shoot into the flank of my 1st Division across the swamp.
I knew I couldn't hold the town for long with 2 brigades vs 2 divisions, but I hope they would be delayed enough to win the battle on my left.
 | |
| The Russians...retreat |
You need to make a morale check if you retreat when within 6 inches of the enemy. All but one one of the Russian units on the left made it, and just...walked away. it's never that easy when I do it!
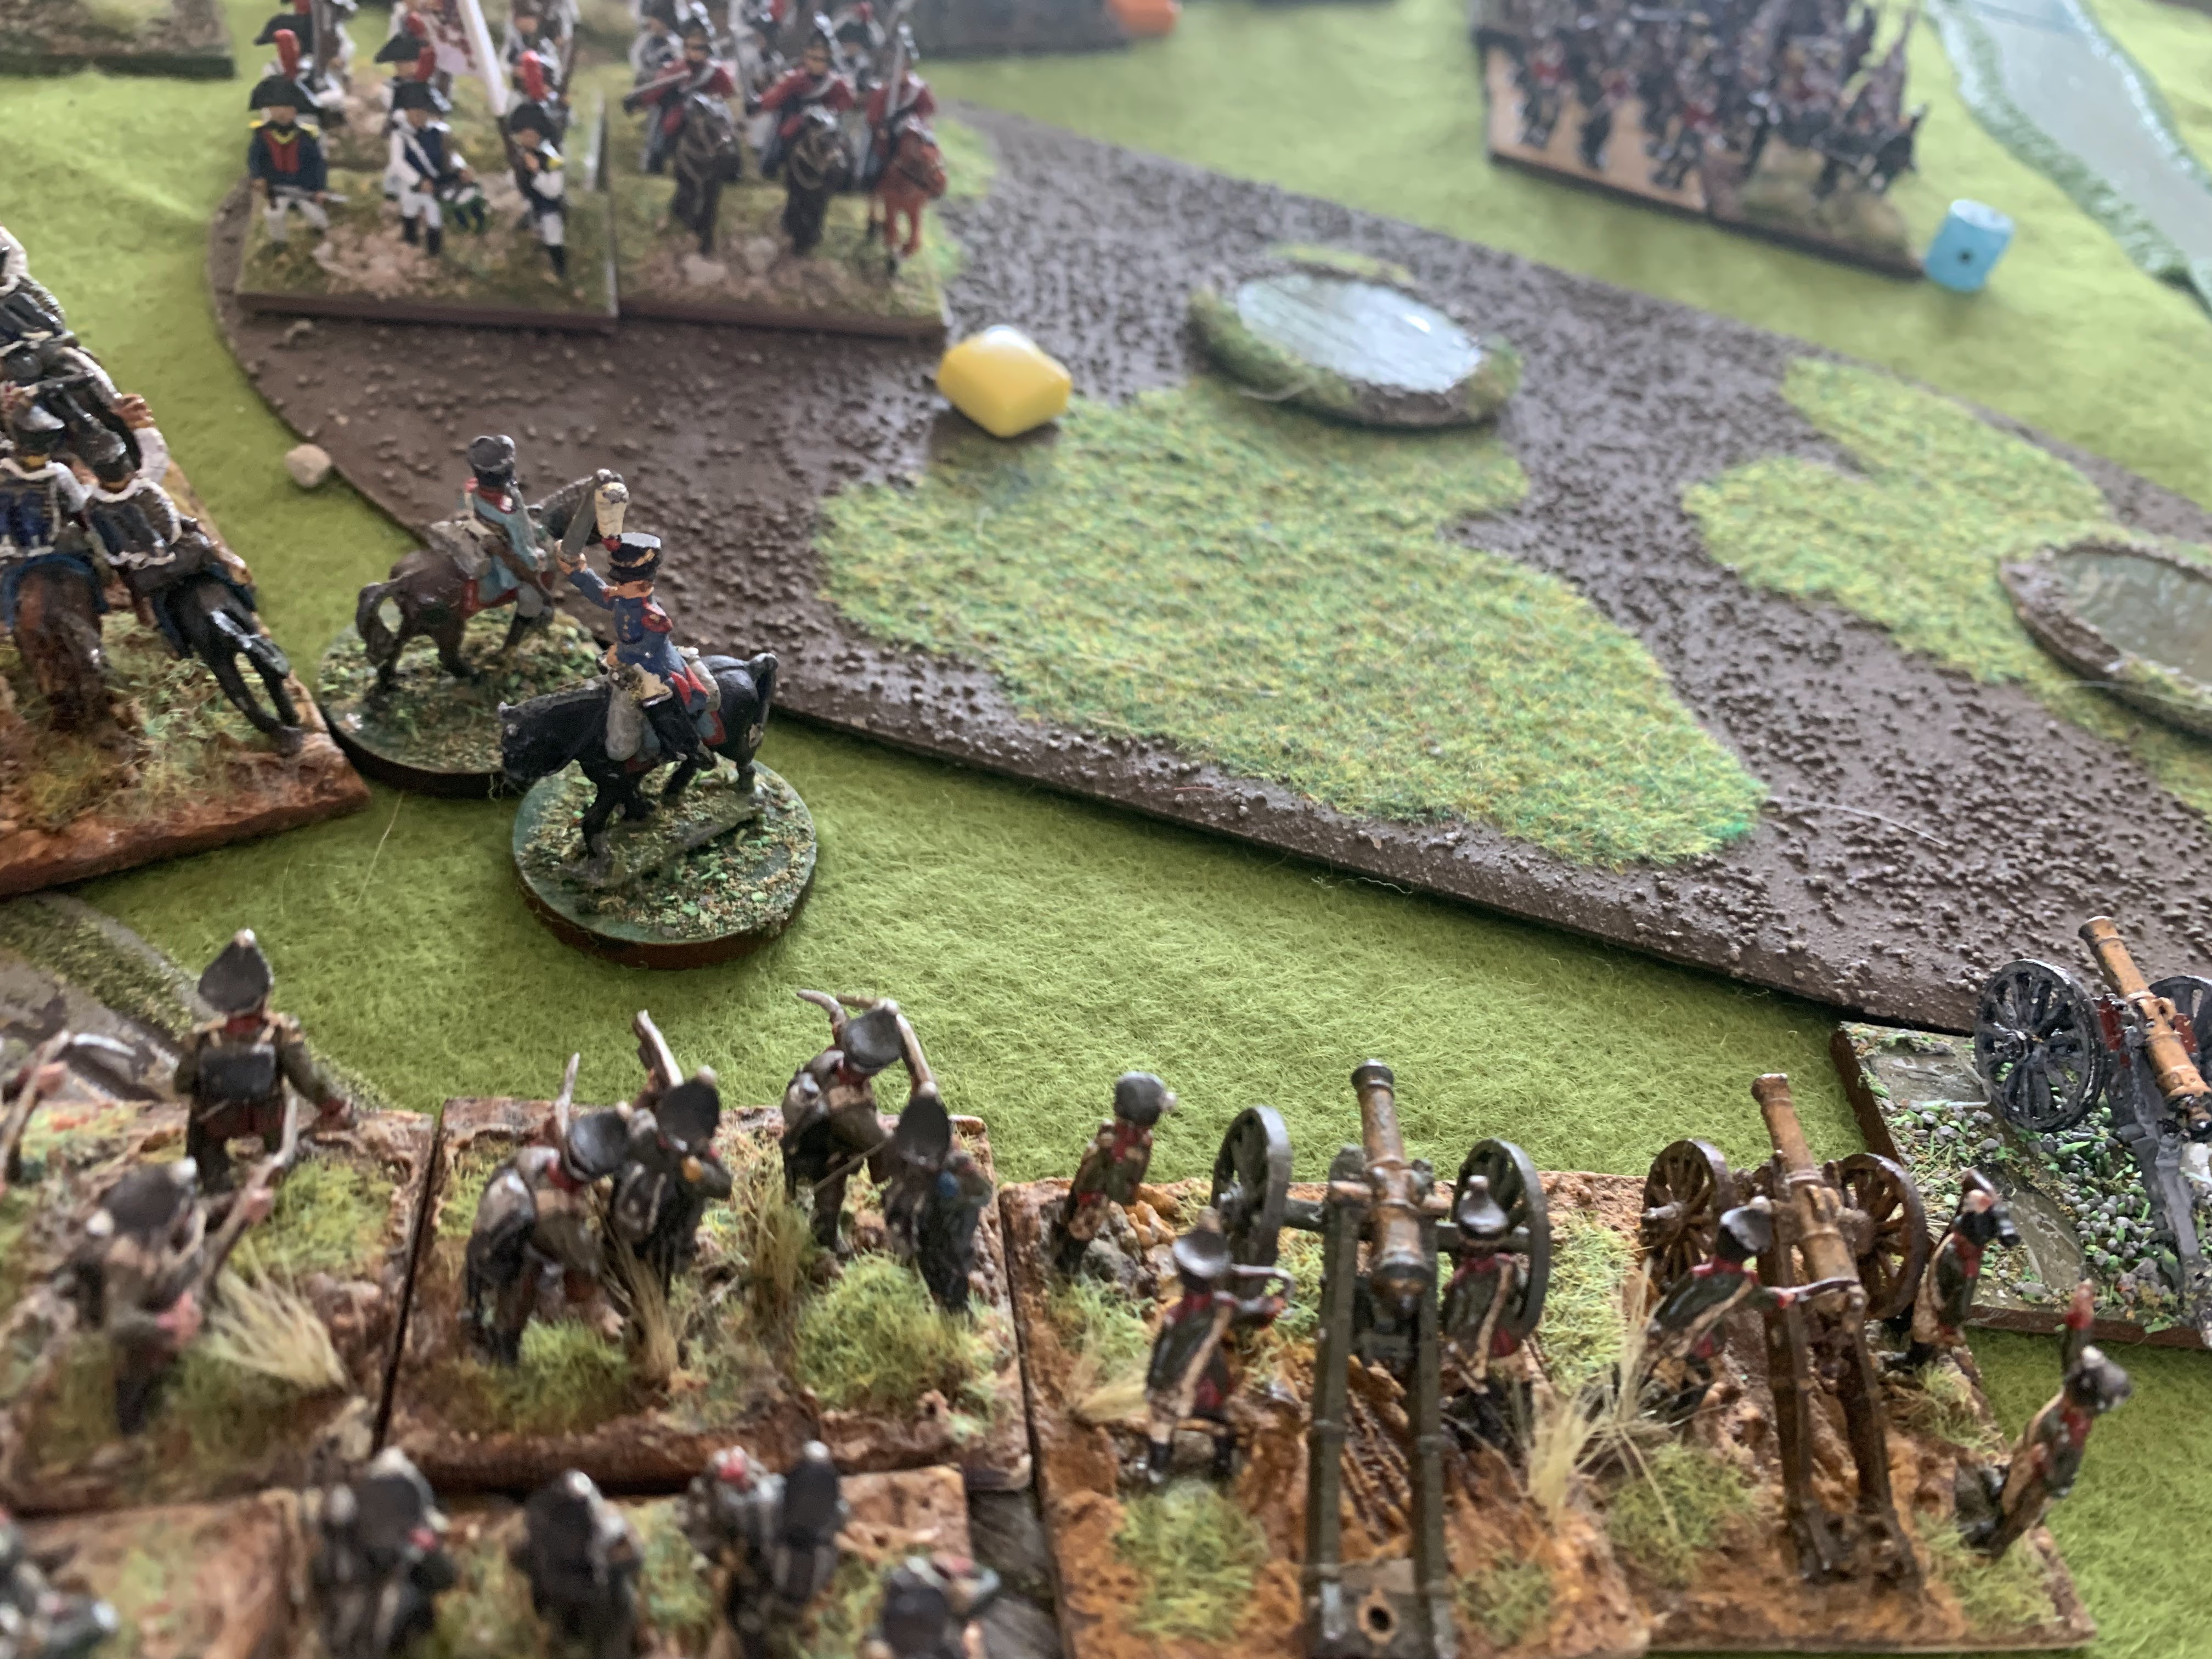
 |
| Enemy Artillery line up on the flank of the KGL infantry and Portuguese brigades |
 | |
| This is how I retreat. Badly. |
So I stupidly let my infantry be shot in the flank at medium range by a medium and heavy artillery battery. What I should have done is turn one of the units right and at least face the fire head on.
The Portuguese unit took a very heavy pounding and fled, wavering through my other unit which got disordered in the process. The conscripts were also disordered.
 | |
| The 2nd Divison arrives in the centre, out of breath and shot up |
With the Light Division on the right flan, I brought in my 2nd (reserve) Division into the centre and decided to cross the swamp to attack his gun line. If I could get some skirmishers on to them, I might be able to cross the swamp and break the centre of his army, as he didn't have any units behind the guns.
However, my rolling was terrible at this time. My 1st Division on the left was either disordered or wavering and my 2nd Division was disordered by moving up with a forced march and then under artillery fire. I needed a turn to re-organize my advance across the river and towards the swamp...and then failed every single rally roll! With re-rolls from my charismatic commander!
 |
| Spanish Guerrillas pin down the heavy artillery with skirmishers |
The one piece of good news was the Spanish Guerrillas were able to get a skirmish point on one of the artillery brigades, which cut their fire down by half.
 |
| 2 Russian Divisions of 4 Brigades prepare to assault the town |
A Russian Cavalry unit in the centre stopped my troops getting any closer and helped clear away a lot of skirmishers I got out. All my Cavalry were on the far left but at least I had the firepower to stop them charging me, and the Spanish were in the swamp.
 |
| The Russian right wing continues to...walk away |
Nothing much I could do about it - my infantry were trying to recovery and the stream was slowing everyone down too much. I could double move towards them, but stop that once I got within 6 inches.
 | |
| Riflemen...deploy! |
One bright spot was that I was able to win the skirmish battle around the town and get a point of it on most of his units. Who then proceeded to pass every morale check!
 |
| My left wing is in tatters |
And then I failed every morale check to recover! I needed time to reorganize before attempting an attack across the river...and I was running out of it.
 |
| The line of battle forms |
My cavalry division split into two- the Heavy Dragoons and Hussar's moved left of the rough terrain field, with the KGL Hussar's moving right to pin the enemy infantry. Mt 1st Division was still trying to recover from the artillery fire and wasn't advancing. My 2nd (reserve) Division was in the middle approaching the swamp. The Guerrillas were in the swamp and my Light Division was on the right holding the town.
On the left the Russian Division was pulling back towards the forest, his artillery firing across the swamp and two divisions attacking the town.
 |
| British Infantry march towards the swamp, the Spanish in it but unable to close with the enemy cavalry. |
 |
| Russian troops attempt to storm the town |
 | |
| Several brigades recoil and the fight continues |
The Superior Veterans of the 95th Rifle Brigade held off the the Russian assault, outnumbered 4 to 1. Two brigades fell back disordered and 2 more stayed in contact.
 |
| In return, the Rifle Brigade is wavering |
The Rifle Brigade held on but it wasn't going to last long. One of the attacking units fell back and recovered, the other one fell back further and was still disordered.
Once again, Dave was able to rally his troops while I could not, despite needing one 5+ on 3d6 with a re-roll!
 | |
| The Russian Artillery pounds away at the Spanish irregulars holding the swamp as the British Infantry very slowing advance under the heavy gunfire |
 |
| Under heavy fire, the Spanish unit is also wavering |
The volley from the irregular's only stopped the enemy light cavalry from moving forward, and the return artillery fire put them at wavering. The only thing stopping them from being charged was the enemy cavalry unit couldn't charge into terrain and was blocking the infantry behind from coming in.
I would note the 3rd edition rules REMOVES the ability for units to deploy in line (so X-X-X-X) which used to lessen the fire you would take from artillery. Apparently it complicated things. I disagree! As someone who usually does not take artillery brigades, it sucks its been removed. With guns on one side of the terrain and no cover from being in it, there's no way to deal with heavy artillery beyond "get your own" or "don't move any infantry in this part of the battlefield".
Also it means you can't say your troops are going into "tactical" formation.
I am also fully aware of advancing line infantry into a swamp into face of enemy artillery is also really bloody stupid. I was re-creating the Battle of New Orleans here.
 |
| The Russian large conscript unit takes the town, and the Rifle Brigade routs |
The inevitable happens and the Rifle Brigade routs off the table - the first unit down. The large Russian conscript unit occupies the town. The routing unit disorders the Loyal Lustrianian Legion next to it.
I really really really needed a good unit in reserve BEHIND the town to then go in and throw them out.
I did not have the spare unit. I should have put my large infantry unit from the 2nd Reserve Division there instead of the swamp.
 | |
| The left wing approaches the Russian right wing |
My 1st Division was STILL not recovered from the artillery fire of many turns ago, but the Calvary was now in a position to start firing their attached Royal Horse Artillery at the Russian division, with their backs to the wall of the forest behind them they were pinned down. In the centre, the 2nd Division was very slowly getting closer to the enemy gun line.
 |
| Skirmishers...DEPLOY. Each dice on a 5+ gets one point |
 | |
| Rifle skirmishers attack the enemy infantry and artillery |
I finally archive what my army is built for, and get skirmisher points on several enemy units..though Dave STILL makes his morale checks at the end of the turn!
 |
| Prepare to charge! |
On the left wing my cavalry and infantry were in position. His left side brigade had been forced to get into square. In the deep background his light cavalry unit was still retreating and his Cossaks (who had been moving across the entire battle) were arriving to support them.
I will reiterate- Irregular light cavalry is still too good. They will never be caught, never be shot and never ever be able to be pinned down and always be able to change anyone they want in the flank.
 |
| The climax of the battle is here |
The battle was it's climax. On the left, I was in position to damage or destroy his right wing. In the centre, my infantry was about to volley his artillery line with nothing behind it. But on my right, I was about to lose my LOC.
 |
| And all his units are fine and several of mine are disordered and wavering |
Well not completely. His conscripts on the far right were disordered...but that's it.Despite having 8 dice to shoot his in square brigade on the far left needing 5+...I did nothing. Two of the units there hadn't been able to rally since the start of the engagement! And my far right unit is wavering.
 |
| After the charges, the cavalry is spent and my units disordered, but one of his is wavering |
I missed getting a picture of it, but both cavalry units charged the enemy in square. They failed to break them but did cause them to be wavering, and the Hussar's recovered quickly.
 |
| My centre is getting in volley range and his right wing is starting to disintegrate |
With the volley and skirmish fire I was wavering and disordering his right wing, and his artillery was getting pinned down by my rifle skirmishers. He was able to get a single skirmish point on one unit though.
 |
| But my right wing is also about to disintegrate, and my LOC has been cut |
...But he was charging into my right wing. I'd moved my last reserve unit of Portuguese down to support it...but there were facing the wrong way! I needed to force mach them behind the line. I could have stayed outside 6 inches from the enemy to force march, but still face within 6 inches of my own to support them. I was trying to get them further right to support the hole I was about to have...
 |
| His units are wavering and disordered. My large unit is also disordered but in better condition than his division |
On the left, his units were about to break.
 |
| AN UTTER ROUT! The units start to rout which causes a chain rout that destroys the entire division! |
And they did. A chain rout started that blew the entire division to pieces in an utter rout. Dave refused to let me take a dramatic picture of the troops fleeing :(
 |
| The Russian infantry charges home |
At this point my LOC is taken...so I should have been trying to rally on a 6 on d6, not 5+, but I was running of what Dave was telling me - I should have asked about it. As is my units started to chain route at this point anyway so I don't think it would have made a difference.
The volleys and charging in forced my units to retreat
 |
| And the Loyal Luistianian Legion routs |
 |
| The Russian's continue to charge |
 |
| Fall hack! Fall back now! |
With the Highlanders falling back and wavering, they run through my last reserve unit (the Portuguese facing the front at right angles) and the Spanish retreat too. Note the irregular guerrillas are only disordered compared to the superior Highlanders!
 |
| The right wing collapses |
In the centre my large infantry unit was unable to advance, and my entire right wing was wavering or disordered, and the Portuguese unit was facing odds of 4 to 1.
 |
| Can I get moving on the left before my right wing gives way? |
My victorious left wing started to move up...oh so slowly. My heavy cavalry had forced his cossaks to retreat out of the forest but I was in no position to go for his LOC as no matter which way I went, his cavalry would be able to flank my Heavy Dragoons. My (now spent) light cavalry was still moving up.In the centre the swamp and artillery had stopped my advance, and right wing was about to rout. Note how many disordered and wavering markers I have compared to the Russians! My rally rolls continued to suck...but now they should only work on a 6+ d6...so not much.
 |
| The Portuguese route |
 | |
| The Russians charge home again |
The Russian hordes continue to charge without any problems whatosever.
 |
| And the result is predictable. Everyone routs. |
 | ||
| The final positions |
My left wing is spent, my centre is giving way, right wing has collapsed. I am at 50% break point and the battle is over.
--------------------------------------------
Dave posted on Facebook later:
Yes was classic both sides are attacking on one flank, I manage to delay his flank attack with Artillery firing on the flank, I managed to quickly take the town with 4 unit assault which opened up his flank centre, my defeated flank was more isolated and would take time to get those units back into the main fight by which time his centre was crumbling, heavy causalities both sides. He did have awful dice.
-------------------------------------------
Another comment:
Dave
is a good player. Very clever how he used terrain to protect his
artillery. As you noted you had an ideal counter available in the
Spanish Guerilla unit. It could navigate the terrain, artillery drop a
dice when boarding them, they are semi-expendable and good at skirmish
fire- which is an Achilles heel for artillery.Another good counter against artillery are large units. Difficult with an expensive Brit army I know.
Lastly,
once the guns are deployed they are slow to redeploy. So a trick is to
try and get your opponent to deploy his massed batteries, then go
elsewhere. Which is what you did. Try to keep over 6" away from the
guns and don't give them flank shots or squares to target. All easier said than done against a good player, I know.
Oh, and rolling better the your opponent can help to....
------------------------------------
Things I needed to have done better:
The biggest mistake was not putting the light infantry in the best place for them- in the swamp. They could have moved through it much faster and put a much higher amount of skirmishes on the enemy guns- as is the Spanish irregular infantry performed the best of my army. I'd put my elite unit in the town, but I should have put my large infantry unit with attached artillery in it instead.
I should have put the stream close to my side and use it as a defence line and been able to cross it faster.
I should have faced my 1st Division Portuguese unit right and not gotten flanked by heavy and medium artillery. That slowed my main attack for 2 turns while I tried to recover from it..and some of the units NEVER fully recovered from it.
I should have put my KGL veteran cavalry on the road and forced him to slow his main advance down (like he did to me on my left). I could have forced marched them to do it.
I needed to force march my cavalry division to be in a position to force him into square faster.
I needed to bring my last reserve brigade over to the right faster and turned to to face the enemy that was about to charge instead of trying to get further right.
I needed an extra road to place on the far left to safe guard my LOC- I could have put it going across the river (giving me a fast crossing point!) and ended it at his town behind the forest for faster movement. Placing a road where you're going to attack is always a good idea!
Unless I know I'm facing another skirmish heavy army (like a British one) I can dump the cavalry detachments - I will tend to win the skirmish fight.
Put large infantry in towns to defend them, but I must have a unit of good troops behind it to counter attack it when I (inevitably) lose it.
I need more charismatic commanders to be able to rally better.
I need to paint my army's bases in division colours to tell whose in what and put flags on the units!
I've wanted to stay away from a British 1815 Waterloo army because it seems to be the default choice for a Napoleonic British army...but it's the best way to get a Veteran, Drilled army with lots of rifle skirmishers and slightly more artillery, AND mixed divisions. Also it would mean collecting Dutch and Wuttenberg units...but I will have to give it a try. I'd use my Warlord EPIC scale but the unit sizes are all wrong for FOG:N. However, if I use them solo, I will not care about that.
And I need to bring my counters and dice next time. Dave's dice favored him immensely!


