Showing posts with label League of Ancients. Show all posts

Wednesday, 5 February 2025

1st Bolt Action battle report Australia 1941 vs Finland 1944

A war, started by an Austrian, caused by Germany invading Poland, results in Australia fighting Finland in the Middle East over a Russian briefcase. 

Can the Australians of the 6th Division stop the Finns from getting it?


Did anyone happen to kill a red spy on their way here? No? Then we still have a problem.


Last week after much planning, theorycrafting (see previous blog posts), buying, painting and much more army list planning, I played my first Bolt Action (V3) game.

The game was at the League of Ancients, appropriately at an RSL club, 1000 points. The mission was to Retrieve the Briefcase, prepared positions, corner deployment. I didn't set the table up for that, the dice rolled it for us.

My army isn't quite ready yet, and I wanted to see if veteran Matilda II's would work, so I didn't have any transports with me. I would have to walk it.

The terrain was a small road running down the middle of a forest. In the middle were the ruins of a village with some stone walls and the briefcase being behind the furthest one to my right of the road.  Due to wartime censorship, the objective marker will be hidden. I should have used one my carts to be it.

The Plan: 

My plan was to use one Matty with one small Rifle Bren squad and have a larger engineer squad to flank and assault the objective, each with a platoon commander. AT Rifle and Light Mortar would support the right flank attack to capture the ruins next to the objective. Sniper would scout ahead in forest edge to flank the enemy and the artillery spotter on the left where the ground was more open.  

The large engineer squads would capture the briefcase and exfiltrate right to the forest, with cover from the building ruins to their front.

The army advanced up the road

Advancing into the sun

The Finnish army set up in a more defensive position. A MMG on the road and squad to the left behind a ruin were setup in ambush to cover the briefcase. Two squads were to assault it on the left on the road. Another squad was in position on the left behind some ruins and a mediam mortar on the far right and AT rifle on the far left to advance into the forest. An armored car and Stug IV were in reserve, His sniper deployed to hunt my sniper that was in a position to hunt his mortar. 

Battle:

Both armies in position

His Sniper vs my Sniper and Observer

He got the first order dice and forced my sniper team to go to ground. His fire pinned my team down.

A Matilda II runs to cover the objective, just behind the stone wall on the right of the road

My army advances. The engineer squad runs to get into cover with the AT rifle team covering them. A Bren gun rifle squad with a Lt is behind on the left them for covering fire.

The Finnish troops advance forward, with some fire coming down on them but not enough to slow them down.

I don't think he failed a single order roll the entire game. I found getting pins on the enemy not very useful!
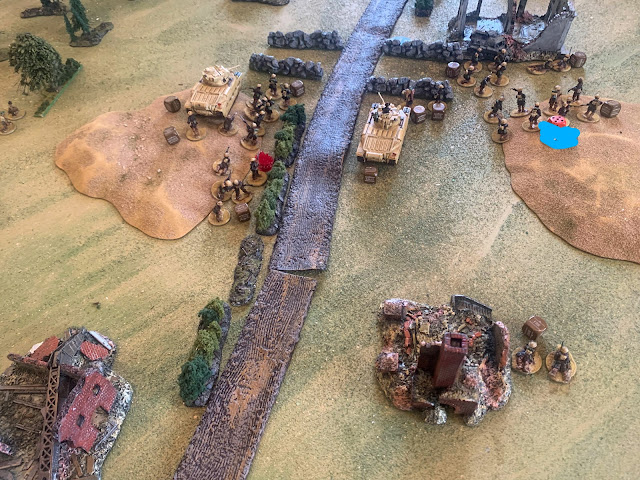
Meanwhile I failed nearly every order test, despite having regular troops!

I moved nearly my entire army forward, except those who failed their pin tests. Mortar's started  dropping on my right, though as yet missing. I used a SNAP-TO order to get both flanks moving, but it didn't help much. His MMG had fired down the road and pinned down one of my Bren gun squads on the left.

Finnish SMG squads advance on the right

His assault squad on the right going for the objective was a unit of veterans with SMG's and assault rifles. I did NOT want to get near them, but had no choice. Another squad moved up the right into the ruins behind them. His left flank stays behind the ruins there to cover the Briefcase.

My FO gets shot at

I stupidly kept thinking I needed to leave the FO until last. What I needed to do was call in an artillery strike AFTER the units I was targeting on the right stopped moving after their orders were completed. The result was they got shot at, failed their test and did nothing this turn!

Australian riflemen and Bren gun secure the ruins next to the briefcase and shoot up the enemy assault squad to their front

I didn't actually NEED Engineers because I couldn't find any intact houses to use as terrain. Most of the terrain is for 15mm, not 25mm. But I suspect most battles will have a lot of buildings on them, and costing only +1 point to be able to get simultaneous close combat seems a no brainier.

The left hand squads advance up the road

I really should have RUN into the cover, instead of trying to advance. I need to learn to RUN from cover to cover.

Some of the engineers on the left get into cover

Matilda II fires over the heads of the infantry in front

I could have fired at the Stug IV in front, but I wanted to eliminate the squad going for the briefcase. the enemy squad ahead of this tank was going to be too far away to get to it and needed to cover some open ground. 
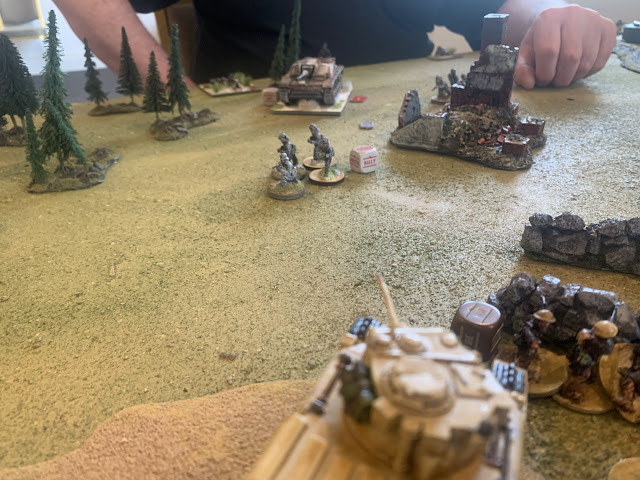
Artillery strike - FIRE FOR EFFECT

I got my first FO shot off just as the enemy Stug IV with a large AT gun arrived on the field. The artillery landed dead centre of 2 squads and got a direct hit on the one behind the ruins, 3 pins on the assault gun and pins on the squad in the open. I thought that would be enough to shut down that flank.

It was not.

Australian Infantry just behind the stone walls, with the briefcase on the right marked in red

I thought I had this in the bag, so moved my 2nd tank to the right to flank the still incoming enemy assault squad. Having a SLOW tank meant it took two turns to get there, but I also wanted to get a flank shot at the Stug.

SECURE THE BRIEFCASE!

I got a hand to the briefcase! And found to my horror you STOP IMMEDIATELY. Here I am, holding it in front of 3 squads of enemy infantry. I've lost the squad in the ruins to my right from close range automatic fire. The enemy squad in the open on the left was shot down to 1 man. 

A man on a mission.

A platoon commander holds the ruins with his webley pistol

All I had to hold the ruins now was a Lt with his pistol and the Boys rifle team. A squad of enemy infantry were to their front and an assault team to the front of the brief case.

I tried to pull the objective out...and failed my order test! DOWN it goes. 

Oh Shit.

THERE'S A MATILDA COMING DOWN THE STREET!

Finally, the slow ass Matty rounded the corner and opened fire on the enemy unit about to assault the ruins. It shot down 1 man and caused some pins.

Medium armour vs heavy gun

The Stug had already taken one shot and missed and it has 3 pin markers. How bad could it be?

BOOM. Bang. KABOOM!

I really should have shot at the Stug first. Meanwhile, the last survivor of his squad advance up and shot down my troops with no cover from his flank shot! Now my left flank was collapsing.

Mortar fire! Take cover!

I didn't take cover. His medium mortar over two turns wiped out the squad on the left front and then the reminder on the road. Meanwhile, my squad with the briefcase was pinned down!

Everything's going to hell, fast!

My left flank was down to a pinned down small Bren Gun squad. My right flank was down to the medic (who had made 3-4 saves already!), the SOLE SURVIVOR LEFT with the briefcase running right and the platoon commander and the Boys AT team!

However, his left flank was gone too

But, I had eliminated both enemy squads on my right flank. The Lt was pinned down in the ruins, the Boys failed to hit the Stug and the Medic was the last man standing in front my fleeing Sargent with the briefcase, and the Matty was about to be hit in the flank by a 75mm round!

Running away with a squad of angry Finns (is there any other kind?) and a Stug chasing me!

We'd lost track of what turn it is (I need to bring a big 6 sided dice next time to do that) but we assumed it was turn 5. Then 6 didn't happen, so the game ended in a draw. I was too far from the edge to escape in one more turn in any case. I did finish the game WITH the objective, so I am calling this a tactical victory

My FO had got a 2nd shot off, but it diverted left to the other flank, causing one pin. One more inch and it would have hit the Stug too. His AT rifle team was on the far left in the forest and spent the entire battle moving towards my FO and not doing anything. Conversely, my light mortar got one hit the entire game and caused 1 casualty.

Lest we Forget (the many mistakes I made).

Conclusions:

I had a lot of thoughts post game I put on my previous post here.
 
I think I had the better plan, moving all my army to go for the objective, but made several mistakes that cost me the game. The biggest one being you need to RUN, as fast as you can, to get the objective and back again. I should have dropped some smoke once I had it too. 

I am very glad I brought the medic. He made about 5 saves through the game and kept the last guy with the briefcase alive at least twice! With my left flank, gone and my right flank running away as fast possible with fire going over their head, the game was very cinematic. As promised. 
 
Matilda II tanks by Warlord Games. Australian Bardia infantry by Slave2Gaming. Paint by Army Painter.  Terrain by the League of Ancients.
 
 
Someone once told me, Bolt Action is the comic book of the movie of WW2. Mission Accomplished. 

Sunday, 2 February 2025

Thoughts after completing my first Bolt Action game

 Battle report will come later I hope. Lot to think about. In random order:


The Red Spy is in the base! Protect the intelligence! 

We need to protect the briefcase!

The mission was The Red Spy Is In The Base: PROTECT THE BRIEFCASE.  I have been dreaming of that mission for weeks. It was the perfect mission I wanted to play.

FO's are as good as everyone says there were. I got lucky with one direct hit and lots of pins on 2-3 units at a time. I should get a recce platoon and stick one in a Bren Gun Carrier keep him from getting sniped.

I think his mate saw me. Ping! Yes, yes he did.

I need to shoot my Sniper immediately. I didn't, got counted sniped and should have targeted his sniper that was hunting mine. My Sniper was a waste, though it did keep his sniper busy for 2 turns.

His mediam mortar didn't do much until I left a squad under it's target icon and it wiped out the squad in 2 turns.  Always move units targeted by mortars!

He set up his MMG to cover the objective in a classic setup to cover the objective down the road in ambush, and I fell for it. An excellent use for it, and out of range of my light mortar. 

I should have run my platoon commander in front of it to get it to shoot first, THEN run the rest of the squad over!

Inexperienced platoon commanders can work fine, particularity if they just have a pistol and no other men with them.

Veteran Matilda II's aren't worth it unless your opponent is playing early war too. 

8 men are the minimum to assault and hold an objective, but you really want 10. 

A 8-10 man assault squad backed up by 5 man LMG squad works well.

My regular troops kept failing order tests and his kept passing.  I need some veteran engineers or recce infantry as assault troops. 10 man squads are also useful because you WILL take pins before you take casualties.

When an enemy tank with a heavy anti tank gun is to your front, activate your armour first!

FO's don't need to wait till the end of the turn, they can mark their target one enemy units at the target location have completed their orders!  

I got lucky with my 2nd FO artillery strike, it deviated onto another one of his units, though just missed hitting his Stug IV. 

Smoke rounds for artillery or my mortar should have been dropped on the objective once I knew I was going to get to it first.

When you get the briefcase, you STOP.  Remember that next time.

 I don't think you can daisy chain the brief case to run away, so any unit going for it must RUN every turn. You don't have time to advance or fire!

Veteran troops in cover are very survivable.  

Having a tank, small LMG cover squad and larger assault squad works. 

Pinned units can unpin themselves very easily. I dropped artillery on a Stug IV and it just shrugged off 3 pins next turn.

Template weapons are what you use to attack enemy infantry in cover.

If taking two tanks, always use the tanks together. Don't drive off in another direction, particularly with slow tanks!

I could have put my tanks in hull down and got cover from that and still covered the objective. 

I need to get 2 man, 4 and 5 man movement templates, 1 inch apart to maintain coherency and 1 inch boundary.

I need to mark my unit types (I ran out of time yesterday). 

Getting 2-3 assistants as meat shields for the FO is worth it. Arm them with rifles or SMG's as a small squad to use as a reinforcement later in the battle, and being able to act a s spotter for light mortars. 

The AT rifle didn't hit an enemy tank (though it took a shot it missed the flank of the Stug IV) but it killed 2-3 infantry so that was ok.

Snap too is a very good command to get things done, but you WILL lose the initiative of choosing what to do after your opponent will, so it looks pretty balanced. There's a reason not to do it every turn or use a Company Commander to move 4 units at once. You don't need to do it.

I kept failing my order dice rolls and had 2 morale roles and Lt was close enough to do and good enough to do. Coy Co's are not required in all army lists. 

I had an order dice advantage, but using a snap too would remove it. I need more order dice.

The Medic made his points back, but would not have if he'd had an assistant.  

Bolt Action is REALLY good at not stopping or slowing the game down. I kept doing an order, and stopping to sit down to wait for when it's my turn but you don't do that.  Conversely there's suspense of not knowing if it's your turn next and happiness when you get multiple orders in a row and despair when your opponent does.

There is not going to be a Conquest Bolt Action tournament :(. No one's put their hand up to do it, and they don't have the room left now for the tables :(.

I need to keep track of turns with a big dice in the corner.

I think I maintained sight on the objective better, but at the end, a lone Sargent, a Lt and the medic were the only ones near the briefcase, with the Sargent going hell for leather why a squad of Finns with MP39's and a 75mm Stug chased after him, while the AT rifle, light mortar and 4 men from another tried squad tried to hold them off. The FO and one assistant were stuck on the other side of the battlefield.  Very comic book like I must say. It ended in a draw, but I needed 2 turns to escape because the unit with the briefcase got stuck going DOWN after a failed order roll. Another reason to get some veterans.


I still need one day to get a Bolt Action army printed out as the Team from Team Fortress. I would have so many lines to use!

Sunday, 31 January 2021

A training exercise - Anglo-Portuguese vs Anglo-Portuguese Meeting Engagement (LoA Tournament game #4 Jan 2021)

A  British Army training exercise - Anglo-Portuguese Army vs Anglo-Portuguese Army

 (LoA Tournament game #4 Jan 2021)


 With LISBON safe and secure following three successful defenses of the LINES OF TORRES VEDRAS, Lord WELLINGTON has decided to conduct a TRAINING EXERCISE.


The exercise is designed to test the offensive power and maneuvers of his ANGLO-PORTUGUESE army. 


Two different corps of troops will conduct a MEETING ENGAGEMENT while umpires will observe and report the results...


Portuguese, British and Scottish troops observe the approaching "Red enemy force" from a hill top.

For my 4th game in the League of Ancients January 2021 tournament,  I played another Anglo-Portuguese Peninsula army 1809-11 army  Dave has defeated me multiple times, though I did get one victory when he was/is teaching me the game in my 2nd ever game.

Dave literately wrote the book on how to win Field of Glory Napoleonic battles...and he was using the same basic army list as I was. I did not go into this battle with much confidence...

Tuesday, 26 January 2021

The third attack on the Lines of Torres Vedras (LoA Tourny game #3 Jan 2021)

The third attack on the Lines of Torres Vedras

(LoA Tournament game #3, Jan 2021)


Following his second failure to break through the LINES OF TORRES VEDRAS, the EMPEROR  of France, NAPOLEON, has launched a third assault to break the ANGLO-PORTUGUESE army and complete his CONQUEST of EUROPE.


Losing patience with the repeated FAILURE of the subservient allies of Russia and Austria, The Emperor commits a full Corps of FRENCH infantry to launch a PROBING attack to discover a weak point in the defenders line. 


Will the mass of SUPERIOR infantry,  HEAVY artillery and OUTNUMBERING cavalry break the lines this time, or will the outnumbered defenders continue to HOLD THE LINES OF TORRES VEDRAS...


Viscount Wellington with his ADC's and staff, observes the French advance guard from a ridge line.

In my third game of the League of Ancients January 2021 Field of Glory Tournament, I faced a French 1805-07 army lead by Paul Graham, who was also at his first tournament. Despite playing less games, he was much more familiar with the rules and was able to correct and help me with them several times. My apologies for getting so many wrong.

Thursday, 21 January 2021

More theory crafting army list post LoA Jan 2021 Tournement

4 Divisions, 3 Cavalry and Maximum Artillery

More theorycrafting of a new army list, following from the lessons learnt at the LoA Tournament. 

The 1st Division was to unwieldy with two large infantry units, and the division reserve of a small Superior Highlander unit too small.  Also it needs a cavalry attachment to have better staying power and the other two units near heavy firepower to see off cavalry by themselves, or form square and do enough damage to force enemy horse to move away. And they now have Rifle companies attached to maybe slow down enemy general's too.

Likewise the 95th Rifles need more firepower, their performance wasn't great. I think the Loyal Lustrian brigade did more damage.